Git || GitHub || VS Code

Most of use may be familiar with Git, GitHub, VS Code. Many of us would have worked with these. But a lot of people has some confusion with these. Let’s clear them all. Here you will get to know about using git and GitHub in vs code.
Installation & Account Creation
First of all install the following if you have not installed them yet :
Create a GitHub account if you don’t have yet.
Now we are ready to go. Let’s start with VS code. Open a new terminal on you VS Code . First of all we will check if git has been installed on your system or not. Write the following command in terminal :
git — — version
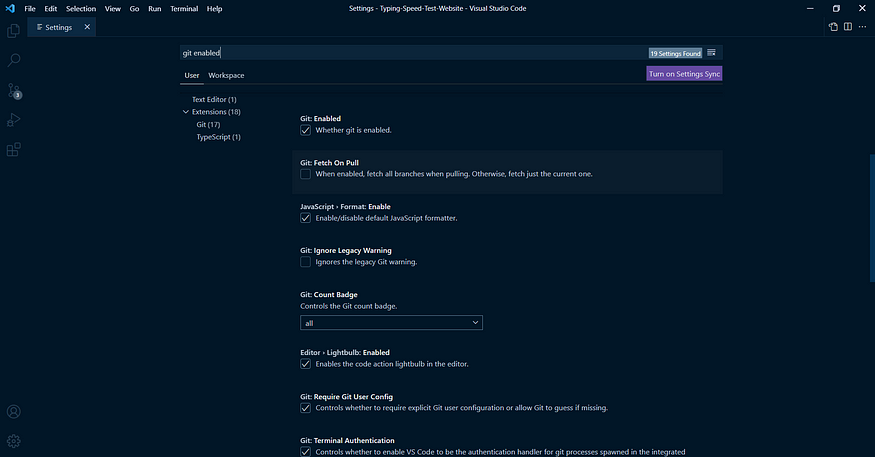
This will show you the version of git installed on your system. If any error occurs try installing git again. So now git has been successfully installed on your system. Next step is to go to settings on VS Code and search for ‘git enabled’ . You can find the settings at lower left corner. After that you will find a box named ‘Git: Enabled’ . Make sure that it has been ticked. Now git ready to work on your system.
Configuration of GitHub credentials in VS Code
Now let’s start configuring your GitHub account to your VS Code, In simple words we are going to connect your GitHub account to your VS Code using few lines of code.
Write the following command in your terminal. Make sure to replace “yourusername” and “email@youremail.com” with your own GitHub account credentials.
git config — — global user.name “yourusername”
git config — — global user.email “email@youremail.com”
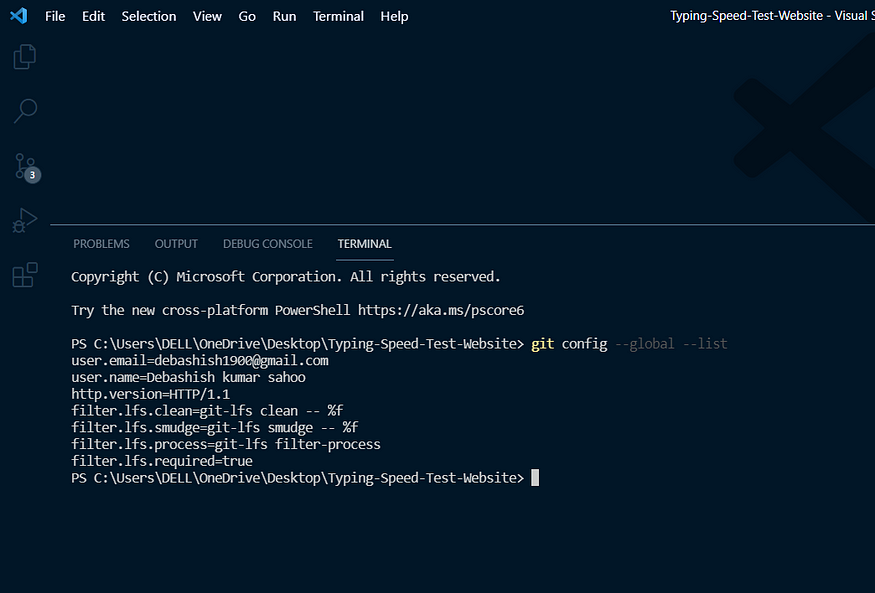
Now let’s check if your username and email has been added or not. To check that try the following command on terminal.
git config — — global — — list
It will show your username and email. Make sure that you get your email as user.email and your name as user.name. Here I have shown the output of my console.
Working on Projects
Why do we use Git while working on projects? Git tracks the changes you make to files, so you have a record of what has been done, and you can revert to specific versions should you ever need to. Git also makes collaboration easier, allowing changes by multiple people to all be merged into one source. So regardless of whether you write code that only you will see, or work as part of a team, Git will be useful for you.
So now let’s get started with the basic requirements to get started with a project using Git, GitHub and VS Code.
Let’s suppose you are creating a project and you need to add it to GitHub and want to keep track of the changes. You can start working with git in your project by following command in your terminal.
git init
After creating the project when you want to add it to GitHub account or when you want to keep track of changes you can write the following command in your terminal. Make sure that ‘message’ can be anything (It will not be name of your project) , It can be something related to that part.
git add .
git commit -m ‘message’
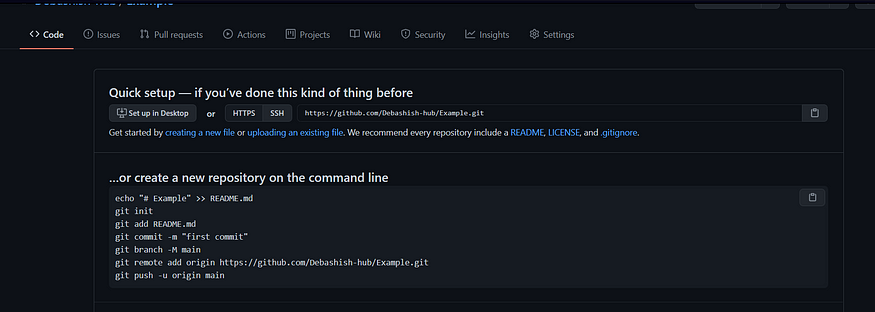
Then just go to your GitHub account and create a new repository. Start with the name of your project. You can add a readme and license in the beginning or even later. Then type the following command in your VS Code terminal.
git branch -M main
git remote add origin https://github.com/Debashish-hub/Example.git
git push -u origin main
You can the above codes in your GitHub repository when you start creating the repository. Make sure to replace your own credentials in the place of my credentials.
After you have completed the above steps, You can go to your GitHub account and you will get your project there. Congrats you got a successful commit.
For the next time onwards when you add different things on the same project you can use the following commands only and get your project updated on GitHub.
git add .
git commit -m ‘message’
git push origin
Contributing to Projects
Open source contribution, Everyone must have heard about this. I will not tell all the details about that because various projects has various guidelines. I will just tell the basic things to contribute on a project.
First of all find the project to which you want to contribute. You can find a fork button on top right corner. When you fork the repository it comes to your account. Now just go to your VS Code and open a new window. You can select ‘Clone Git Repository’ there. After that you can paste the link there or you can select ‘Choose from GitHub’ which will show you the list of repositories in your account. Choose the repository you had forked to contribute. It will download everything on the project. Now you can start working on the project. Make the required changes. After you are done with your work write the following commands in your terminal.
git add .
git commit -m ‘message’
git push origin
After that just go to the git repository on browser, there you can find a button ‘merge’ .Click on merge which will create a pull request. Then you may need to add some description of your work and some screen shots if required. Finally submit it and wait for the project admin to merge your pull request.
Congratulations you are an open source contributor.
Conclusion
I hope it will be helpful for you. It is a beginner friendly blog. There are a lot more advanced features which will be there in upcoming blogs.
Thank you all!


Comments
Post a Comment